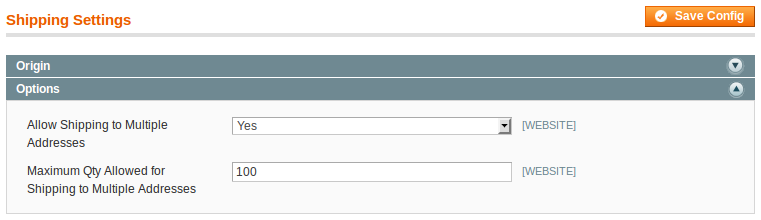
Multishipping checkout, as its name suggests, offers a possibility to order products to different shipping addresses. To use Multishipping checkout you must enable it in the back-end configuration at System > Configuration > Sales > Shipping Settings > Options > Allow Shipping to Multiple Addresses.
Multishipping checkout availability may also depend on some other factors:
- Minimum order amount. You can control the minimum order amount using options found at System > Configuration > Sales > Minimum Order Amount. If you set Validate Each Address Separately in Multi-address Checkout to yes the system will check each address for minimum amount separately, which means that the total for each address must be greater than or equal to the pre-set minimum order amount.
- Physical products. Multshipping checkout is about delivery to real addresses and requires at least one valid physical item. Downloadable or virtual products need no shipping addresses and are irrelevant for Multishipping. Note that if there is a composite product whose children can be shipped separately, they are counted separately as well.
- No nominal items. Nominal items are related to recurring profiles and are irrelevant for Multishipping, therefore a multishipping quote must not contain non-virtual nominal items.
Multishipping checkout is not available to guests. Also, new customers must register (and provide an address) before using Multishipping, which is different from Onepage checkout where new customers can choose to create an account after going through the checkout and submitting an order.
Unlike Onpepage checkout, Multishipping doesn’t accommodate all checkout steps in one page. This makes it simpler because no complex JavaScript interaction is required to reflect the checkout process or to navigate between steps. But still, each step must be implemented in a separate view and a controller action. The blocks related to Multishipping can be found under app/code/core/Mage/Checkout/Block/Multishipping and they correspond to the following checkout steps:
- Select Addresses – Addresses.php
- Shipping Information – Shipping.php
- Billing Information – Billing.php
- Place Order – Overview.php
- Order Success – Success.php
The layouts for Multishipping checkout steps and related views are defined in file app/design/frontend/base/default/layout/checkout.xml in lines 113 – 294. Most of the layouts include an update handle directive <update handle="checkout_multishipping"/> that sets up a basic structure for the checkout page by assigning the one column template, removing the right and left sidebars and adding a child block checkout/multishipping_state to display the checkout progress.
´<checkout_multishipping translate="label">
    <label>Multishipping Checkout</label>
    <!-- Mage_Checkout -->
    <remove name="right"/>
    <remove name="left"/>

    <reference name="root">
        <action method="setTemplate"><template>page/1column.phtml</template></action>
    </reference>
    <reference name="content">
        <block type="checkout/multishipping_state" name="checkout_state"
            template="checkout/multishipping/state.phtml"/>
    </reference>
</checkout_multishipping>
Listing 1. Main layout of Multishipping checkout, app/design/frontend/base/default/layout/checkout.xml, line 113
Checkout with Multiple Addresses
If you are using the default Magento theme and have Multishipping checkout enabled, you can spot a link “Checkout with Multiple Addresses” right below the “Proceed to Checkout” button. This button will lead you to the default, one-page checkout, while clicking that link will start the checkout with multiple addresses.
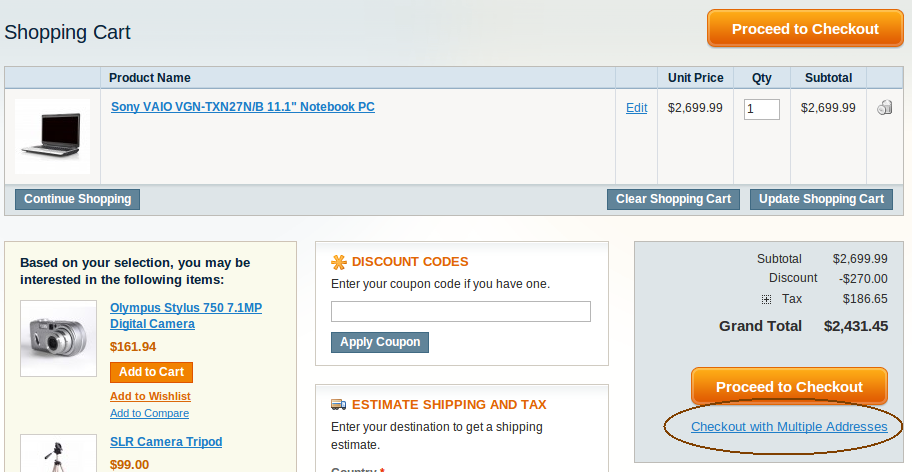
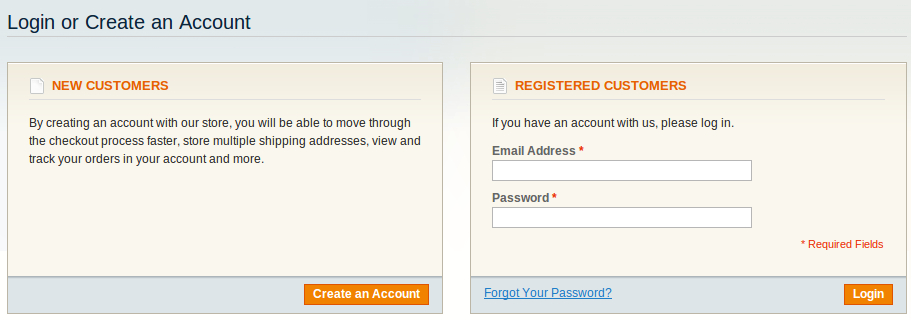
Unless you are already logged in, you will be redirected to the login action of Multishipping checkout. Notice that this step has no option to checkout without first either logging in or registering a new account. Obviously, no guest checkout is available.
Once logged in, you will be redirected to the first checkout step, “Select Addresses”.
Select Addresses
In this step you can select a shipping address for each cart item. Despite being called Multishipping, this checkout type also allows you to order one product to one address.
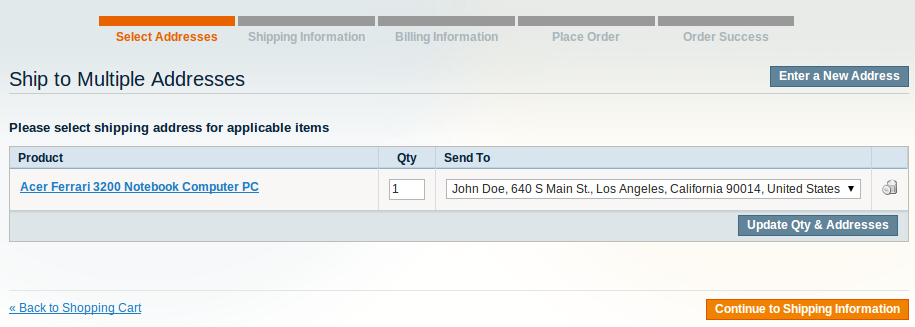
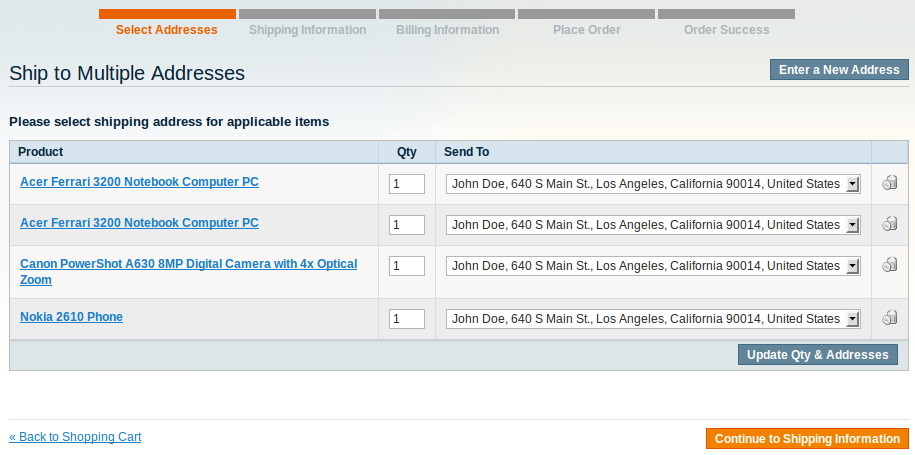
Note that if one of the cart items has quantity greater than 1, you can send it separately to multiple adresses too. The drop-down lists in the “Sent To” column allow you to select adresses from your address book. If the desired shipping address is not present, you can create it by clicking the “Enter a New Address” button. The new address function is implemented in class Mage_Checkout_Multishipping_AddressController. Its method newShippingAction() loads a layout consisting of a multishipping checkout progress block and a customer address form. The latter is a standard address form block Mage_Customer_Block_Address_Edit that is also used in customer account forms and everywhere a customer address must be created. After you fill out and submit the address form, the system redirects you back to the “Addresses” step.
Once you’re done assigning products to addresses, click the “Continue to Shipping Information” button to post the data. The controller method that processes the addresses form is addressesPostAction. There, the system uses a Multishipping checkout object instance to set the shipping information extracted from the POST parameter “ship”:
´if ($shipToInfo = $this->getRequest()->getPost('ship')) {
    $this->_getCheckout()->setShippingItemsInformation($shipToInfo);
}
Listing 2. Processing the addresses step posted data, app/code/core/Mage/Checkout/controllers/MultishippingController.php, line 253.
The “ship” parameter is an array containing quote item IDs, address IDs and item quantities assigned to those addresses. The checkout model’s methods setShippingItemsInformation() and _addShippingItem transform these data into quote address to quote items relationships that are saved into table sales_flat_quote_address_item. After that you are redirected to the next checkout step Shipping Information.
Shipping Information
In this step you must select a shipping method for each address. The shop, where the screenshot in Figure 6 was taken, has only one shipping method available: “Flat Rate”. You can enable and configure other shipping methods in the back-end at System > Configuration > Sales > Shipping Methods and they will appear in this checkout step as a radio-button list.
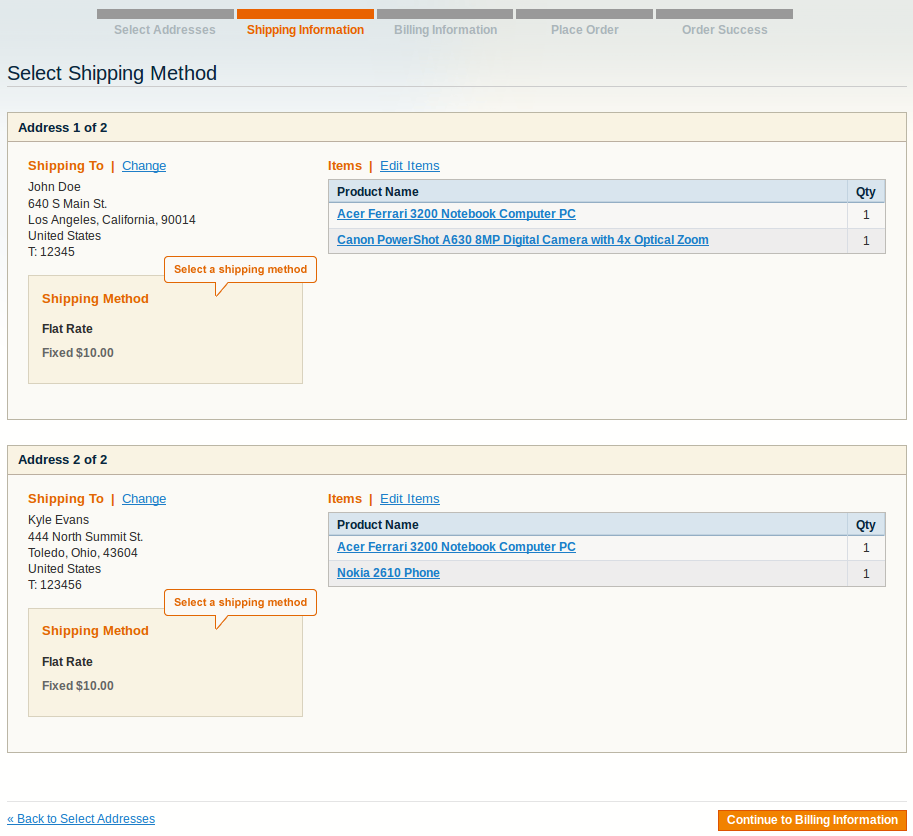
If you are not satisfied with a selected address you can click the “Change” link next to it. This will open a page where a form generated by a Mage_Customer_Block_Address_Edit type block. A change made to an address here will be saved not only in the current quote but also in the customer address book. If you merely want to select another existing address or enter a new one, you’d better go back to the step before. This can be done by clicking “Edit Items” next to a list of items, or the “« Back to Select Addresses” link, or the browser’s “Back” button. The latter case is safe because the system will reset the checkout back to the previous step.
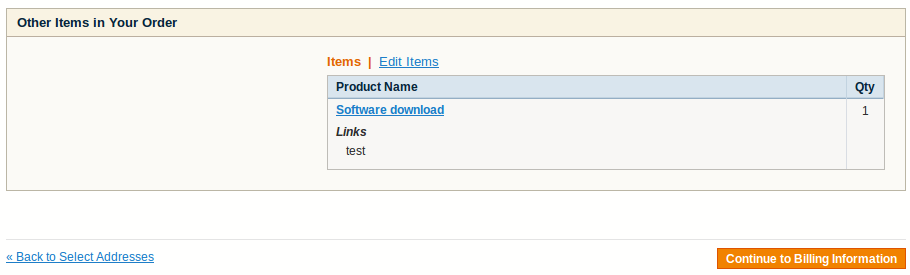
If your cart contains virtual products, e.g. downloads, they will also be displayed in this step. But because virtual products require no shipping address (and you couldn’t have assigned any to them in the first checkout step), they will be grouped into a list titled “Other Items in Your Order”:
After you click the “Continue to Billing Information” this step’s data are posted to the multishipping controller’s shippingPostAction() action where they are passed to the Multishipping checkout model’s method setShippingMethods(). This method goes through all the addresses of the current quote and sets the shipping method assigned to them. The system collects the quote’s totals and saves it. After that you are redirected to step “Billing Information”.
Billing Information
In this step you can review your billing address that initially is either a default billing address or, if the customer has none, the first valid address from the customer’s address book.
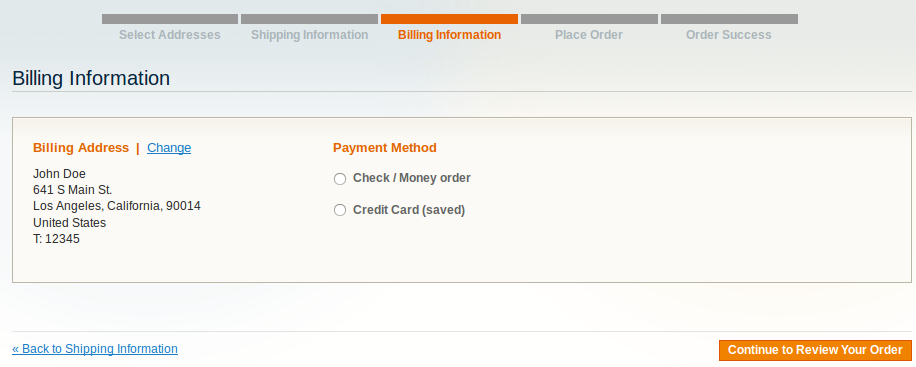
If you want to select a different address, click the “Change” link and you will be redirected to a page that lists all the addresses from your address book. You can edit them, enter a new one, and finally select one to the the billing address in this checkout:

In this step you also must select a payment method. The methods listed here are configured and enabled in the back-end configuration at System > Configuration > Sales > Payment Methods.
This step’s form is posted to the multishipping controller’s overviewAction() action that is responsible for both saving the billing information step and for displaying the last step of Multishippping checkout, “Overview”. The payment information is processed by the checkout model’s instance in function setPaymentMethod() that saves the selected method to the quote and triggers the re-calculation of the quote’s shipping costs that can be influenced by some payment methods. After that you are presented with an overview of your order.
Place Order
In this step you can review the order details that are divided into “Billing Information” (billing address and payment method), “Shipping Information” (one or more shipping addresses whith their shipping methods, items and totals), and “Other Items in Your Order” that is displayed only if the cart contains virtual items.
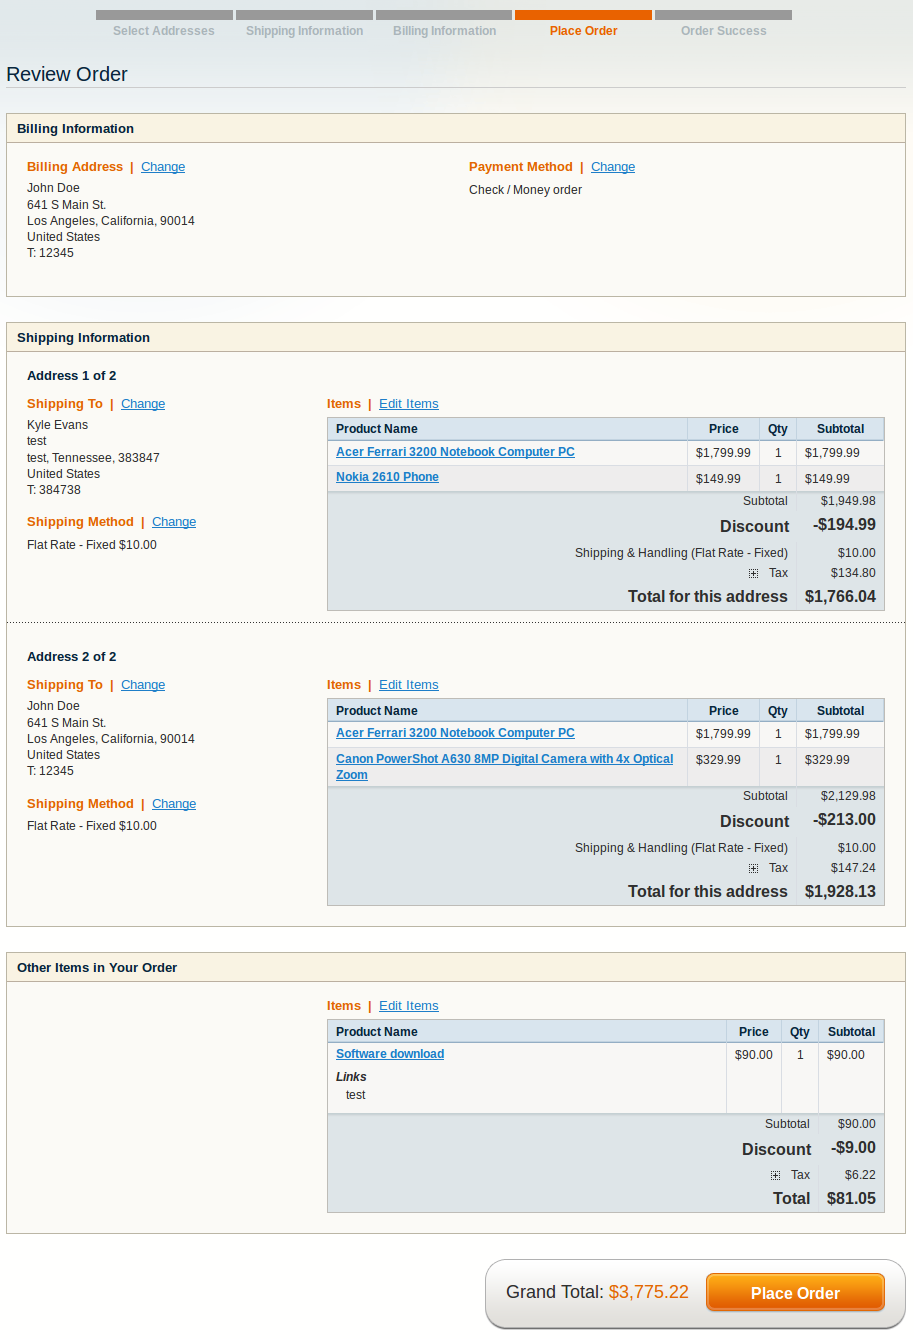
Note that each address has its own totals: subtotal, discount, shipping costs, tax and grand total. The template file used in this step iterates through all the quote’s shipping addresses and calls the overview block’s method getShippingAddressTotals() for each address object:
´public function getShippingAddressTotals($address)
{
    $totals = $address->getTotals();
    foreach ($totals as $total) {
        if ($total->getCode()=='grand_total') {
            if ($address->getAddressType() == Mage_Sales_Model_Quote_Address::TYPE_BILLING) {
                $total->setTitle($this->__('Total'));
            }
            else {
                $total->setTitle($this->__('Total for this address'));
            }
        }
    }
    return $totals;
}
Listing 3. Generating address totals for the overview step, app/code/core/Mage/Checkout/Block/Multishipping/Overview.php, line 139.
The $address parameter is an instance of type Mage_Sales_Model_Quote_Address whose method getTotals() uses so-called “sales quote totals” models to calculate totals for a shipping address. The sum of the addresses’ grand totals makes up the order grand total displayed next to the “Place Order” button.
The discount rule used in the example in Figure 10 is a 10% off the cart total. Since this is a multishipping order, the discount value is calculated separately for each address.
Submitting an Order
Order submission is processed by the multishipping controller’s overviewPostAction() method. First, it checks if the customer has agreed to the required checkout agreements (you can set up these agreements in the back-end at Sales > Terms and Conditions). Then the method fetches an instance of the multishipping checkout object and calls its method createOrders(). There, the system validates the quote:
- the quote must be multishipping
- a payment method must be set and be available to the quote
- all shipping addresses must be valid
- a shipping method must be set and its rate must not be undefined
- the billing address must be valid
Once the quote is validated, the system gets the quote’s shipping addresses. If the quote has virtual items, the list of the shipping addresses is extended with the billing address that will be used for virtual items. Then the system iterates through the addresses and creates an order for each of them.
´$orderIds = array();
$this->_validate();
$shippingAddresses = $this->getQuote()->getAllShippingAddresses();
$orders = array();

if ($this->getQuote()->hasVirtualItems()) {
    $shippingAddresses[] = $this->getQuote()->getBillingAddress();
}

try {
    foreach ($shippingAddresses as $address) {
    $order = $this->_prepareOrder($address);

    $orders[] = $order;
    Mage::dispatchEvent(
        'checkout_type_multishipping_create_orders_single',
        array('order'=>$order, 'address'=>$address)
    );
}
Listing 4. First steps in the createOrders() method, app/code/core/Mage/Checkout/Model/Type/Multishipping.php, line 498.
The orders are created in method _prepareOrder() where the addresses are converted to order addresses and address items to order items. After this conversion the orders are placed, saved and order emails are sent.
´foreach ($orders as $order) {
    $order->place();
    $order->save();
    if ($order->getCanSendNewEmailFlag()){
        $order->sendNewOrderEmail();
    }
    $orderIds[$order->getId()] = $order->getIncrementId();
}

Mage::getSingleton('core/session')->setOrderIds($orderIds);
Mage::getSingleton('checkout/session')->setLastQuoteId($this->getQuote()->getId());

$this->getQuote()
    ->setIsActive(false)
    ->save();
Listing 5. Orders are created, saved and emails are sent, app/code/core/Mage/Checkout/Model/Type/Multishipping.php, line 520.
The checkout is complete and the system redirects you to the last step, “Order Success”.
Order Success
In my example I ordered four physical and one virtual item. The physical products must be sent to two different addresses which results in two orders: 100000010 and 100000011. The system has also created an order for the virtual item: 100000012:

Conclusion
Multishipping checkout is a built-in checkout method in Magento. Even though multi-page checkouts are frowned upon for low usability, this implementation is quite intuitive and user-friendly. It allows users to order goods to multiple addresses but also can be used in a “single address mode”. If for some reason you are not comfortable with the default One-Page checkout, you can switch it off and use Multishipping (but beware its availability rules), or you can write your own version of a multi-page checkout on its base. The architecture of Multishipping checkout is also straightforward: an MVC pattern with a controller Mage_Checkout_MultishippingController to process requests, a model Mage_Checkout_Model_Type_Multishipping to implement business logic, and views, Mage_Checkout_Block_Multishipping_* blocks, to handle the user interface. This approach is much simpler than a hybrid MVC PHP – JavaScript hybrid used for the One-Page checkout.
This tutorial is very helpful, but i didn’t find where the customer provide his credit card info? can you please help me to sort out this issue for multi checkout
NOTE : i am using (Innovate Payment)p ayment gateway for multi checkout
Hi Arshad,
I’ve checked the Multishipping checkout’s billing section and it works fine with the child form of the standard “Credit Card (saved)” payment method. I have no experience with the extension you are using. So, unfortunately, the only advice I can give is to contact the author and try to clear it with him.
Hi Oleg Ishenko,
Thanks for the wonderful explanation gave mw a clear idea.
I have few doubts.
If my payment gateway is through third party then how does the order splitting works. can you explain that.
The tutorial is wonderful. But how we can add the “enter a new address button” for each line item on the cart? and when click the button form should be jquery dropdown type. Please help regarding that?
Hello, Nice tutorial. Currently, addresses are displaying for every product in the cart. Is it possible to display addresses according to product categories? For ex. if there are 7 products from 3 categories present in the cart then instead of displaying 7 different address fields, just show 3 address fields and process next steps.
I believe I have set everything up correctly, but I get an error at checkout:
PayPal gateway has rejected request. Invalid token (#10410: Invalid token).
Does PayPal not work with the multi-shipping feature?
Any help is greatly appreciated!
Turtle
Hello,
Your tutorial is very good. But I want to split items even if the shipping address is same for two items in the cart. Can you help me out with the solution.
Thanks,
Rahul